Showing posts with label in the freezer. Show all posts

Thursday, February 26, 2015

Frozen Biscuits Made from Scratch


It took me a long time to get to the point where I could consistently make what I consider to be be good biscuits. Some of the time they were really good and sometimes they weren't all that great. They still tasted better than canned biscuits though. 

I loved the convenience of buying the frozen biscuits, because I could pull out just a couple and bake as needed. After my biscuit baking skills improved, I still bought the frozen ones sometimes because of how quickly I could get breakfast on the table during the week.

I am not a morning person at all. Making biscuits from scratch could only happen on the weekends and during the week, breakfast needs to be as quick as possible. I finally got around to making a batch of biscuits, cutting them out and freezing them! Ahh, the best of both worlds, we can have scratch made buttermilk biscuits any day of the week. I can serve biscuits without having to be awake enough to make them.

After making my dough and rolling and cutting them out, I freeze them in a single layer on a cookie sheet. When they are completely frozen I put them in a freezer bag.


Buttermilk Biscuits

2 cups self rising flour 
1/2 cup cold butter +2 Tbs of melted butter
1 cup cold buttermilk

Preheat oven to 450.

In a large mixing bowl combine the flour and the cold butter with a pastry knife or a fork until it is crumbly. Work quickly, because you want that butter to stay cold. Add the cold buttermilk and mix until dough forms. You may need to add just a bit more flour if the dough is too sticky.

Turn out the dough onto a floured work surface and pat it down with your hands. Turning and folding the dough a couple of times, you want to make sure you do not overwork your dough. Pat it out again, until it about 1" thick and cut out your biscuits. Place cut out biscuits onto a cookie sheet with the sides touching.

Bake for 10-12 minutes until golden brown and then remove from the oven. As soon as they come out of the oven, brush with the melted butter.

***I have found that if I put my flour in the food processor and cut in my butter and add the buttermilk, all in the food processor, that it is quicker. And working quicker in this case works better because everything stays cold. I also handle the dough a little less so the biscuits are a little more tender.

Wednesday, February 11, 2015

One for Dinner--One (or two) for the Freezer


I have a lot of recipes I have collected over the years that work well for the freezer. Many of them are designed for the crock pot, but some of them are complete meals that can go in the oven. When I make one of these meals for dinner, I will make one or two for the freezer. 

I try to keep at least 8-10 meals in the freezer so I have a selection of things to choose from on days when I just can't, or don't want to cook. Having them ready to go also allows me to take a meal to someone. Yesterday, I made a batch of soup for a friend that got out of the hospital and I also gave her a meal from my freezer so that she would have an additional meal as she recuperates.

They key is making sure your meals get rotated enough that you don't lose them in the freezer! My method is very simple. I have a dry erase board on the freezer that lists the meal and the date that they were assembled. New meals get added to the bottom of the list and I scratch them off as we eat them. I also write the name of the meal, date assembled and cooking directions (if needed) on the outside of the zip top bag, a sharpie works great for that! For ease of marking, I label the bags before filling them, I learned that lesson the hard way!! These are labeled on the other side.


This is a taco soup that we really like.

Taco Soup

1 lb ground beef
1 onion, diced
1 small can of tomato sauce
1 can kidney beans, with liquid
1 can chili beans with sauce
2 cans diced tomatoes, we like the petite diced
1 can of corn, with liquid
1 can diced green chilie
2 cups of water
1 pkg of taco seasoning

Cook the ground beef until it is done and drain. Let cool and add to the freezer bag. 

Add everything else to the bag and freeze.

To use: I pull out the night before using and let it cook in the crock pot for 6-8 hours on low.

If I forget to pull it out the night before I will let the frozen bag sit in the sink with water until it starts to defrost.


Wednesday, April 30, 2014

Quiche for the Freezer

I do like to have a variety of meals in the freezer for those nights I don't have time to cook or don't feel like cooking. I like to have at least three to four different meals in the freezer at one time so that I don't get tired of my "go to meal". I usually have a quiche or two in there because we both like them and served with a simple salad makes a nice meal.

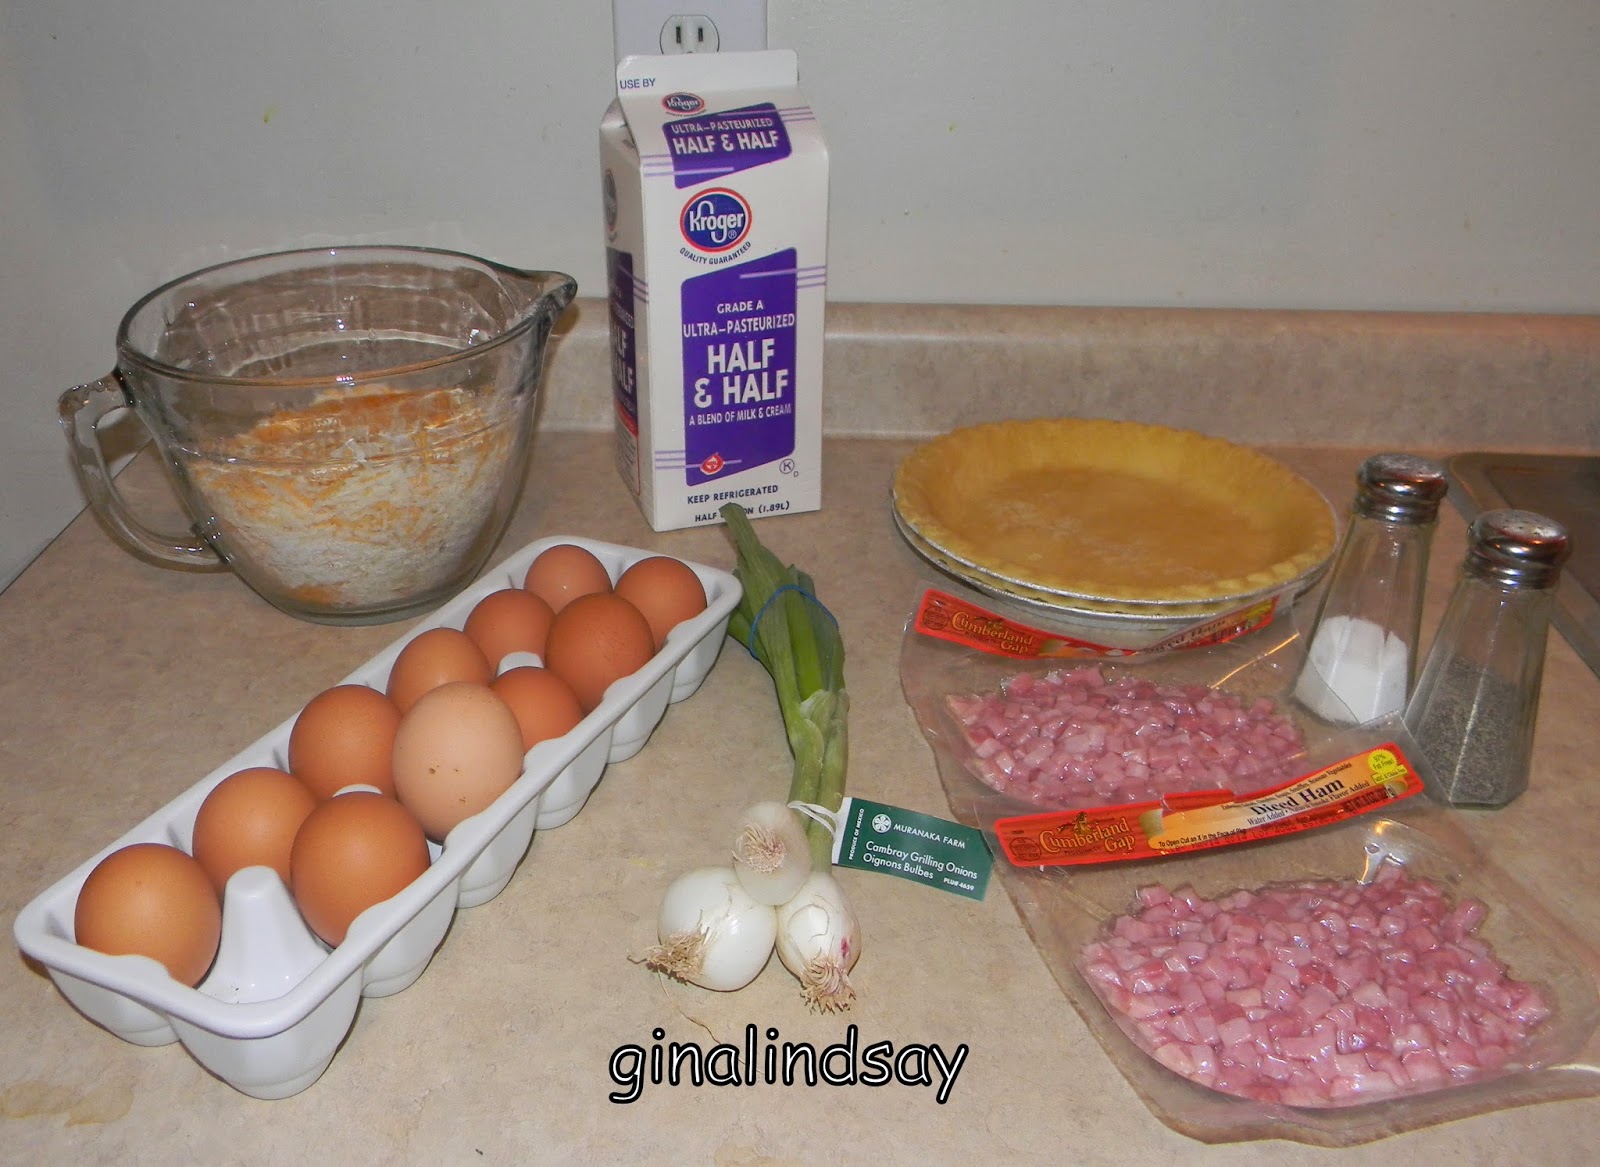
Usually when I am cooking for the freezer, I cook one for dinner that night and one or two for the freezer. This particular quiche has ham, cheese and green onions in it, but I often just put in whatevr sounds good or whatever I have on hand.


I usually make my own pie crusts, but with quiche, or anything else that will go in the freezer for later I use the ones from the frozen section at the store. It make whipping these up even faster and they come in a pie tin so I don't have to remember to buy those.


I sprinkle about a cup of cheese on the bottom of the crusts. I used a mix of sharp cheddar and Monterrey jack for this batch.


Then on top of that, I spread about a cup of diced ham.


In a bowl I will mix the eggs, cream, veggies, salt and pepper, and a small pinch of nutmeg.


After that is mixed, the egg mixture is poured into the shell over the ham and cheese. At this point, I will set the shells cookie sheet and stick them in the freezer for about an hour. After they are starting to freeze, I will pull them out and wrap them in foil. If I try and wrap them as soon as I mix them, I tend to make a mess getting the foil around the pie pan. Much less of a mess for me if I let it freeze a bit.


When I am ready to serve these, I will pull them out of the freezer the morning that I plan to use it and let it defrost in the fridge for at least a couple of hours. When ready to cook, I bake it in a 375 degree oven for about 35-40 minutes.


Basic Quiche

pie shell
1 cup cheese (a single cheese or a mixture)
3/4 - 1 cup of meat (ham, bacon, etc)
2 chopped green onions (or about a cup of  chopped veggies-broccoli, mushrooms or asparagus work great)
4 large eggs
3/4 cup half and half
salt and pepper to taste
pinch of nutmeg

Sprinkle cheese over bottom of pie shell. Top with ham or other meat. You can add veggies at this point, but if I am using green onions, I add them in the next step.

Mix together eggs, half and half, salt and pepper and pinch of nutmeg. Pour over the ham and cheese layers. 

If freezing; wrap in heavy duty foil and place in freezer. To cook let defrost for a bit then cook in a 375 degree oven for 35-40 minutes. 

If you want to bake it immediately, just skip the freezer part and bake for 35-40 minutes in a 375* oven.

Thursday, February 20, 2014

Food Prep Day

One of the things I get asked a lot deals with the amount of time that I spend cooking and how I find the time to make so much food from scratch. I also get asked how much time I spend cooking each day. I'm not going to lie, switching over to eating real foods did take some getting used to and at first I was overwhelmed by how long it took me to do everything. But the longer you do something, the faster it becomes and you learn time saving tips as you go. 

I will share some of my other tips:

MENU PLANNING I wrote more about meal planning in the post below, but I do consider this my number one time saver. Knowing what I am having through the week allows me to do prep work one time for multiple meals. If I know that I need chopped onions for three different meals, I can go ahead and chop three onions while I am preparing for that first meal, it only takes a couple of extra minutes and I only have to wash my cutting board and knife once, not three different times. Not only does that save time it also gives me less dishes to wash! 

BULK COOKING If I am at all able I will make extras of something so that I can freeze part of them. If I make waffles, I make extra and some go in the freezer. I let them cool, then wrap them in wax paper and place into a freezer bag. Lots of prepared foods can be frozen and if I am not sure, I search on Google "do waffles freeze well?" and can find the answer pretty quickly. I then have the convenience of  the processed foods that I gave up, and I have the peace of mind of knowing that the food is prepared with ingredients that I want in my body.

FOOD PREP DAY I have one day a week that I put some effort into preparing food to be eaten on those crazy days that I don't have a lot of time to cook, don't feel like cooking, or if I am just having a bad pain day and am unable to cook. I usually plan at least one meal a week that can be easily doubled or tripled. We will eat one of those meals on the night they are planned, and the other one or two meals go in the freezer to be eaten at a later time.

Another food prep day may include a canning project. I can throughout the year and the majority of my canning is done seasonally. Since nothing is coming in during the winter months, I focus on canning things like soups, chili, meat that I find on sale and different types of  beans. This week I will be making a batch of pork and beans to go in the pantry. 

Sometimes my food prep might be making a dessert item. If I make a full batch of a dessert we either eat too much of it or part of it gets thrown away. On a food prep day I might make a couple of batches of  different cookies. I will use my scoop to measure out the cookie dough and then freeze them on a cookie sheet in a single layer. When they are frozen I will put them in a freezer bag and I can pull out enough to make for dessert that night without having too much of it sitting around. 


These tips help me save time and still allows us to have food prepared with real ingredients and allows me to have my own stash of "fast food". If you know me personally, you know that I deal with a chronic pain condition and sometimes I have flare ups that leave me unable to stand for very long. In the past, when this would happen I would call my husband and he would pick up dinner at a drive through which kind of defeats our goal of giving up processed foods. Since I have meals in jars or in the freezer, I can now get a home coked meal on the table quicker than he can go to the drive through and with almost no effort on my part. (In his defense, he could cook dinner, but we would be eating dinner pretty late by the time he got home and got dinner going).


My next post will be how I keep up with all the food in the freezer!

Monday, February 10, 2014

Cupcake Fun


We are huge fans of The Walking Dead here at my house and last night was the midseason premier so I decided to have a little fun with some cupcakes. My goal originally was to color some of the icing red, but I had not one drop of any kind of red coloring. Instead of frosting is some mashed raspberries, which tasted so good!

I love to bake, but with just the two of us, I ended up throwing out the last of something or we ate too much of it. I have been making smaller portions, like individual pies from this post or using my freezer. After baking cupcakes, and letting them cool completely, I will put them on a plate and stick them in the freezer until they are firm, then place them in freezer bags, then I can pull out just enough for dessert for the two and maybe an extra to pack in lunch the next day. This way, we can still enjoy dessert a couple of times a week.

I bought the knives at Halloween. I'll let you know a little secret.....I have a HUGE collection of sprinkles, candy decorations, and other things to decorate cakes of cookies. I have them for every single  holiday and in just about every shape and color that you can imagine. I just can't pass them up when I see them. When the stores first put out their holiday decorations, the first thing I look at is the baking section to see if they have sprinkles that I don't have yet. I store all of my spices in tins on the side of the fridge and a lot of my decorations end up on there too. Here is a peek, I love seeing all the different colors! I love to play around when I am decorating cookies or cupcakes.

Monday, June 17, 2013

Banana Nut Muffins

I am really trying to break several bad food habits and one of them bring waking up late, rushing to get ready for work and out the door on time. If I have not planned breakfast this means one of two things; either I will be eating out of the vending machine at work or I will go through a drive through on the way there. If I even really liked the fast food breakfasts, it would be okay on occasion, but for the most part I really don't even like the food I am eating. The honey buns in the vending machine are another story, I do like them a little too much. 

I try to have some healthier options on hand and one thing I like to do is have muffins in the freezer. I prefer to take them out the night before to defrost in the fridge. Banana Nut muffins are one of my favorites that I try to keep on hand. I use the recipe here, subbing some of the white flour for whole wheat or oat flour.


I like making my own because I know exactly what is in them, I can control the portion size and in the long run they are much more cost efficient. 


Adding in the nuts. This recipe calls for pecans and that is what I used for this batch but I like to use walnuts sometimes too.


Ready to pop in the oven. 


Yummy! They are all done and cooling. I will save a few out for breakfast for the next couple of days, and the rest will go into the freezer to be eaten later.


I love the pan that I use for baking cupcakes and muffins. A long time ago I taught preschool and I used to cook with the kids in the classroom  a lot. One day one of the parents came in with this pan that had been used at the business where she worked. She knew I also loved to cook at home too and when they were giving these away, she grabbed one for me. I have used this heavy duty pan for many, many years and every time I do I remember that sweet parent of one of my preschoolers. 

Monday, February 25, 2013

Chicken Gnocchi Soup

So what am I doing with the gnocchi that is now in my freezer? The night after I made all of the chive gnocchi that is pictured in the post below, we had a big pot of Chicken and Gnocchi Soup. I made the chicken the same day that I made the gnocchi so assembling the soup and getting it on the table was pretty quick.


To make the chicken:
 I started with a whole chicken, put it in my crock put with 2 onions that had been quartered. 4 ribs of celery trimmed and cut into thirds, 2 teaspoons of salt and about the same of pepper, a teaspoon of thyme and enough water that fill the crock pot about 3/4 of the way. I let it cook on low all day. After I got home from work, I pulled the chicken out and separated the meat from the bones. I strained the broth, discarding the veggies because they were pretty much mush. The broth went into the fridge overnight.

To make the soup: 
I pulled the broth out of the fridge and discarded the fat that had congealed on top. The broth went into the soup pot along with about two cups of the chicken, 1 pint of cooked carrots, half a bag of frozen peas and let that simmer for a bit. I had about 1/4 a cup of some onions that had been chopped and sauteed so I added that too. If you wanted you could also add some sliced celery. I will add celery when I am making stock or cooking a chicken or something, but I do not like to eat it in anything. After all of my vegetables were warmed through, I turned up the heat until I had a good boil going. I dropped the frozen gnocchi directly into the boiling soup and let it cook for about five to seven more minutes.


~~~~~~~~~~~


I often get remarks about how much time it takes to actually cook from scratch. In the case of this meal it only too me minutes to prepare the chicken to cook in the crock pot. My return for separating the chicken: I had enough chicken to make dinner from me and Kip, we both had this soup for lunch the next day, and one extra serving for my lunch. I also had enough chicken to freeze for one more meal, plus enough to make a batch of chicken salad for lunches.

It did take me a while to make the gnocchi, but the recipe made enough for Kip and I to have three meals featuring gnocchi.

The carrots in the soup had been canned in the fall and I knew I would need extra onions when I cooked dinner earlier in the week so I made a little extra so that I only had to cut onions and cook chopped onions once.

Do I spend more time in the kitchen than I used to? Yes I do. I try and make the most of my time though so that when I am pressed for time I do have a time crunch we still have healthy options. 


Wednesday, February 20, 2013

In My Freezer

I have really been trying to kick the fast food/drive-thru habit. I do plan all of my meals ahead of time and do a pretty good job sticking to the meal plan. Planning my meals helps me save time and money. I don't wander the store aimlessly grabbing things here and there and since I know what is for dinner, before I go to bed or leave for work I can pull whatever out of the freezer to defrost if needed. There are times though when my schedule gets a little crazy or I simply don't feel like cooking dinner. 

I have mentioned on here several times about my back problems and winter months are particularly hard on me. Some days I simply cannot stand on my feet long enough to get dinner cooked and a nice real food meal was almost always out of the questions on painful days. 

What had been happening too often was me calling Kip and asking him to pick up dinner on the way home from work. He can cook and will if I ask him. The biggest problem with that scenario is that he gets home kind of late and if we had to wait to eat until he gets home to cook then dinner would be around 9:00 p.m. Plus since I have planned the meals and bought groceries to go along with what I planned, what I plan isn't always something he knows how to cook.

Kip has joked ever since we were first married that I don't buy food. I buy ingredients. I think that's cute, but very true and even more so since we started to eat more whole foods.

I have been canning soups, chili and spaghetti sauce so that I have quick, healthier options. I like as much as possible to be in jars, because I only have the freezer on my refrigerator so I am limited by space and if the power goes out then there goes all my hard work. Since not all foods can be safely canned at home, I do want some quick meals or partial meals in the freezer too. 

Tonight I made a Chive Gnocchi. I made enough for dinner tomorrow night and the rest are going into the freezer in meal size portions.


These are ready to pop into the freezer. I will freeze them on this pan until they are firm enough to put into freezer bags. 


The recipe is from the My Spice Sage blog and the link can be found above. I have been ordering from them for several months now and have been very happy with the service, quality and selection that they have. In fact, I got a package from them today!

So now instead of relying on fast food so often, I have enough food options in jars or in the freezer that I can get a quick healthy dinner on the table in a matter of minutes. If it is a really bad day and I need Kip to cook, there are options that he can do quickly too so that if we can still have dinner before it gets too late.